When you initially begin top-rope rising, you consistently have a more seasoned climber set up things for you. Finally, however, there is a time if you wish to establish your very own top-rope anchor.
Access to the very top of paths will be different, as will the accessible anchor points. Assessing and mitigating hazard during anchor installation, even when you’ve got a path to the very top, is essential.
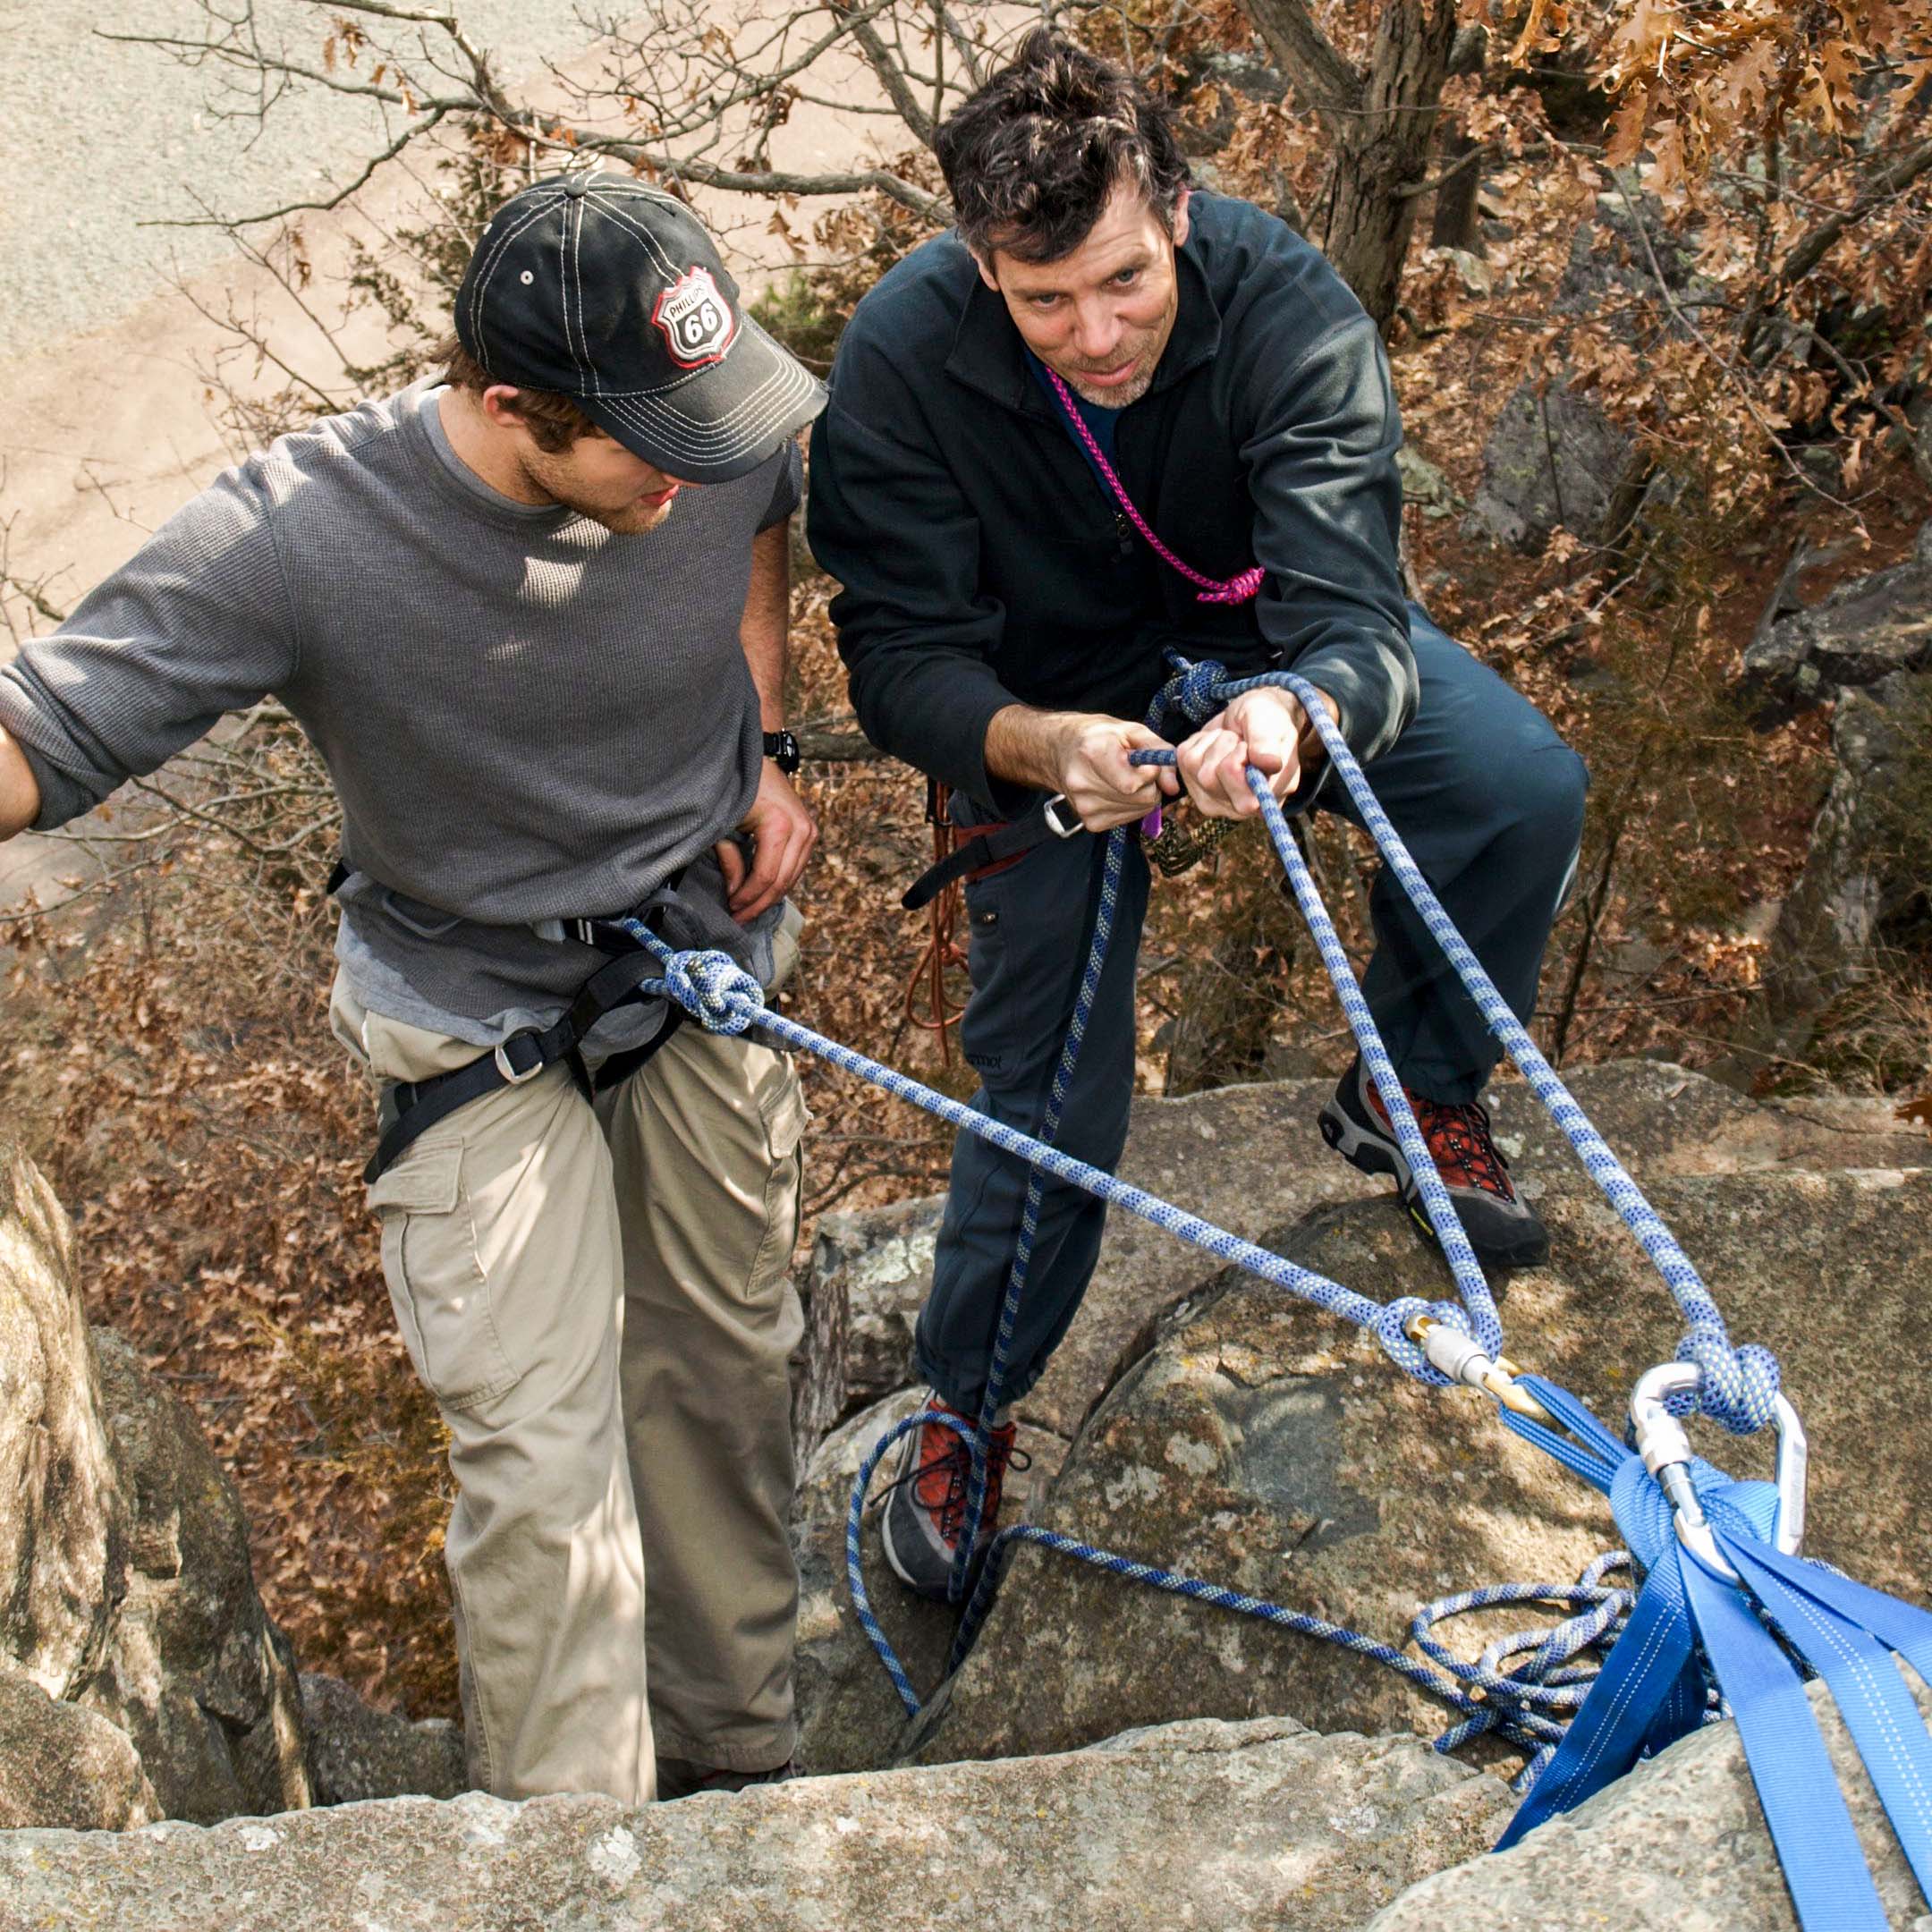
In this guide, we describe how to install one kind of elastic top-rope anchor: the quad. We will also cover cleanup (removing) the quad core once everyone is done scaling.
A Couple of things to Remember:
- We are beginning with a frequent situation: a sport-climbing place with chains and rappel rings dangling from two bolts on peak of the route.
- We presume that you understand how to tie knots, bends and hitches, and that you’re adept at lead scaling , direct belaying and rappelling.
- The very best way to learn these skills would be to locate an experienced climber to educate you, or to register for courses taught by a certified climbing instructor.
Preparing a Top-Rope Anchor With the Quad
Crucial steps:
- Collect your anchor stuff
- Tether at the Peak of the road
- Setup the anchor
- Reduced after anchor installment
Step 1: Collecting Anchor Materials
Along with all of your essential climbing equipment, you Will Need the following:
- Personal Anchor System (PAS) girth hitched to tie-in points onto your exploit (if you use another Kind of anchor leash into a PAS, a few measures here will alter slightly)
- 25 ft of 7mm (or thicker) cordelette tied into a loop using a double fisherman’s bend
- 4 locking carabiners
Measure 2: Tethering on Peak of this Route
Together with your anchor equipment attached to your stand, install and direct climb the path that contributes to the set of bolts in which you intend to construct your top-rope anchor.
When in doubt, select the other route and anchor place. When cutting on to permanent anchor points, your initial choice is really a bolt hanger, then next is a series link and final is really a rappel ring.
- Clip a quickdraw into an acceptable point beneath the bolt, and then clip the rope in that draw.
- Utilize a locking carabiner to clip a loop of the PAS to the exact same clip-in stage since the draw.
- Clip another PAS loop into an acceptable point beneath another bolt.
IMPORTANT: A PAS is intended to hold you quickly, and may fail should you rely upon it to grab a collapse of any space. That means you should select PAS clip-in loops which take all the slack from this PAS.
- Clip the exact same carabiner into one of those bolts.
Hold on the other end of the cordelette loop upward into another bolt. - Grab the very low point from the cordelette loop with your fist.
- Tie an overhand knot on both sides of your fist (approximately 8″ apart)
- Clip a locking carabiner into the two strands of the free end of the cordelette loop.
- Clip the exact same carabiner in the rest of the bolt.
- Produce the energy point of your backbone (at which the upper rope will clip ) by clipping 2 opposed locking carabiners to three of those strands which operate between the knots you tied before –depart the strand loose. This installation limits (grabs ) that the carabiners in case one facet of the backbone fails.
This mnemonic trick can help you examine the level of your anchor. A correctly set-up quad anchor adheres to these vital principles.
Solid: Every part of the anchor has to be totally solid.
Redundant: You should always use redundant elements when constructing an anchor that if one element fails, then the anchor won’t automatically fail. At minimum, utilize two strong anchor points. Make sure that all pieces of your backbone have built in redundancy, such as carabiners and slings.
Efficient: Make efficient use of time and equipment when you are constructing an anchor, and do not produce something that’s overly complex.
No Extension: Build your anchors to ensure if a single anchor point fails, then it will not cause the backbone to abruptly stretch, which will shock load the rest of the anchor points and create high impact forces.
Angles: Take the angles generated by the Twist or slings on your backbone system. Bigger angles put more pressure on every anchor point, so maintain the angles to 60 degrees or less.
Lowering after finishing your backbone follows the Very Same procedures as you can do if top-rope scaling, with a few Additional measures:
- Telephone to your belayer to get”slack” and clip the climbing rope to the carabiners of your anchor power point.
- Next, eliminate and stand your quickdraw.
- Double-check that each and every carabiner is locked.
- Pull yourself up marginally into the backbone and phone for”tension” till all of your weight is on the rope rather than your PAS.
- Unclip your own PAS in the bolts and stand it.
- Telephone to your belayer into”lower” you then follow regular lowering processes.
Key steps:
- Get ready to clean the anchor
- Tether at the Peak of the road
- Break the anchor down
- Rappel back into the floor
Measure 1: Preparing to Wash the Anchor
When you and your team are done together with the climbing session, then prepare for a last scale to wash out the anchor.
- As you did before setting the anchor up, join the PAS by linking a girth hitch through both tie-in points onto your harness.
- Setup and do a closing top-rope climb into the peak of the route.
Measure 2: Tethering on Peak of this Route
These measures are just like those you followed before setting the anchor up.
- Clip a quickdraw to a single bolt, or another fine stage, and clip the rope in that draw.
- Clip another PAS loop into another bolt, making certain you decide on a loop which will keep slack from the PAS as possible operate.
This practice is rather straightforward. Simply unclip the anchor out of both bolts and stand things neatly, attempting to keep bulky things close to the rear of the tap in order that they do not get in the way if you rappel down.
This causes undue wear components which are not designed to survive rope friction. Should you believe you’ve got to lower instead of rappel, then”contribute” a locking carabiner into the crag.
You should be adept at establishing and rappelling. The next steps prepare one to transition into this rappel:
- This prevents a mishandled rope out of plummeting into the floor, stranding you.
- Close to the machine by joining a stopper knot at the end of the rope; this, together with the stopper knot you need to already have attached on the floor end of this rope, so ensures you can not rappel off the rope ends.
- Hold the rope till the centre mark onto the rope will be in the very top point of the rappel.
- Have your belayer affirm that both rope ends are touching the floor.
Your PAS, which should nevertheless be securely connected to both bolts, may also be installed as an extension of your rappel device:
Clip a locking carabiner via two of those loops onto your own PAS, the cable of your rappel device along with the belay loop onto your harness.
Now you are ready to install (and back up) your rappel device, to double everything, then to rappel back down to the floor.